Controlling your DevOps with Argo -
James Land - 28 Feb 2022
Introduction
In this post I am going to demo setting up a CI/CD flow and development deployment using primarily ArgoCD and Tekton. Note I am using the Red Hat flavors (i.e. Openshift Pipelines and Openshift Gitops) of these technologies, and the instructions are performed the following using Openshift 4.9 although they should work fine on any 4.6+ instance.
Technologies
ArgoCD: A technology that uses files inside of source repositories to describe what we want our deployments to look like, installs those objects, and monitors/prevents any “drift” of those Kubernetes objects.
Tekton: A Kubernetes native tool (meaning it can be deployed easily with Argo) that allows us to develop pipelines for our CI/CD workflow.
Prerequisites
- Openshift 4.x Environment
- Openshift Pipelines (Tekton) Operator installed on the cluster
- Openshift Gitops (ArgoCD) Operator installed on the cluster
The rest of this demo will be using this repo. Since our ArgoCD instance will be pointing to a source repo, you may be required to fork and make modifications to this repository in order to suite your environment.
Overview
So, the goal of this demo is to end up with a basic flow to show how we can intertwine the technologies mentioned above to allow developers to more easily manage their applications on Kubernetes. It will show how we can have both our application’s CI/CD workflows and dev deployments all represented inside of our ArgoCD’s UI. Then with a click of a button we can easily build and deploy our application into dev.
Note While we are just showing how to do a basic build and deploy to a dev environment this could easily be expanded to fit a greater need. For example, the final product may include a “promotion” pipeline for deploying to higher environments. And/Or we could allow for a cleaner GitOps flow by adding
TektonTriggers to field calls from your source repository.
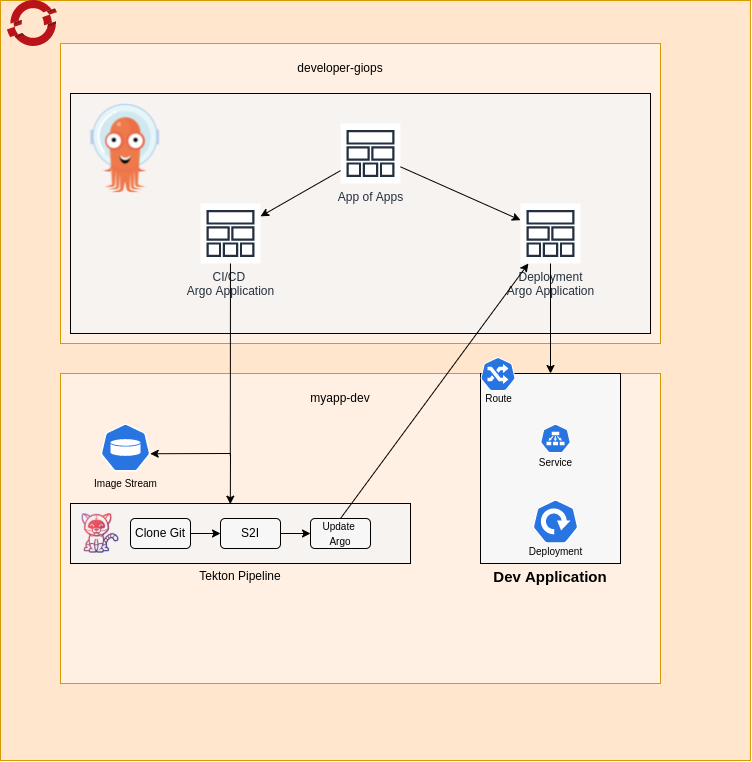
The basic flow for setting up our application’s infrastructure will be as follows:
- The user will deploy an ArgoCD “App of Apps” containing our application’s pipeline and dev environment
- From here Argo should deploy our Tekton Pipeline on our development namespace which consist of
- A task for pulling our source from Git
- A task for compiling that source into an image and pushing to an Openshift ImageStream
- A task for updating our ArgoCD Application for our dev deployment to point to the newly created image
- Once our pipeline has ben run the Argo Application for our dev deployment should now be updated with the newly built image and redeployed
Environment setup
First lets set up our environment. We will create two namespaces one named developer-gitops that will be used to deploy our instance of ArgoCD. And another named myapp-dev which will represent the “development” environment for our application. Note if you decide to name these differently you will need to fork th make the appropriate changes inside.
oc new-project developer-gitops
oc new-project myapp-dev
Tekton
Pipeline Overview
To start with let’s take a look at our Tekton pipeline. I may in the future write a post that goes more in detail on the specific task, but for now lets just try to get a high level understanding. The code for the pipelines can be found here.
As mentioned before the Tekton pipeline will consist of three task: downloading our source, building our image, and updating the argo application. This is all wrapped in a helm chart, than should be deployable directly with the helm install command if you want to test out the pipeline, and the first two task.
The other item contained in this helm chart is the ImageStream. For simplicity we are going to be storing the image built by our S2I process here. If you already have a Docker repository setup, then you can modify the S2I to push directly to that repo in the pipeline.yaml file.
Allowing Tekton Pipeline to Update Argo Application
While there are different (and probably better) ways to handle how you want to tie your pipeline back into your Argo process we are simply going to use oc patch to update our ArgoCD dev deployment Application to use the image we stored inside of our ImageStream. This means first we are going to have to allow the service account that is running the Tekton pipeline, named Pipeline, to have patch access for Applications on our ArgoCD namespace.
In order to do that we will first create the following role on our ArgoCD namespace
apiVersion: rbac.authorization.k8s.io/v1
kind: Role
metadata:
  name: argocd-patch-application
rules:
  - verbs:
      - update
      - patch
      - get
      - list
    apiGroups:
      - argoproj.io
    resources:
      - applications
Then run:
oc policy add-role-to-user \
   argocd-patch-application \
   system:serviceaccount:<APPLICATION_NAMESPACE>:pipeline \
   --rolebinding-name=pipeline-patch-argo-app \
   -n <ARGO_INSTANCE_NAMESPACE> --role-namespace=<ARGO_INSTANCE_NAMESPACE>
ArgoCD
Now we get to the fun part… :boom: Deploying our Application and Infrastructure! :boom:
Installing ArgoCD
Now we will need to install an instance of ArgoCD onto our developer-gitops namespace. More information on how to do can be found in my other blog post here.
Set up Argo AppProject
In order to install the App of Apps below it would be recommended that you create an Argo AppProject, a process which should also be documented here. Otherwise you will need to make some minor code adjustments noted below.
AppProject:
- Name: myapp-argo-project
- Source Repo: https://github.com/Jaland/argo-tekton-flow.git (or your repo)
- Destinations:
- My App Project:
- Server: https://kubernetes.default.svc
- Name: app-namespace
- Namespace: myapp-dev
- Argo Project (the App of Apps will be pushed into our Argo Namespace):
- Server: https://kubernetes.default.svc
- Name: argo-namespace
- Namespace: developer-gitops
- My App Project:
Install App Of Apps
We will be installing everything required to run our application using an “App of Apps” concept. Basically what this mean is we created an ArgoCD Application that contains other ArgoCD Applications representing our infrastructure and the application deployment.
Tip It may seem overly complicated using App of Apps on this demo project, but a real application will normally be more complex. Our App of Apps will probably contain multiple types of CI/CD workflows, it may represent more than one microservice, and depending on how we set up the ArgoCD instance could even be spread across multiple clusters.
Lets do the installation of our App of Apps through the Argo UI
Click the + New App button on the top left of the home screen then fill out the following values:
- General:
- Application Name: myapp-app-of-apps
- Project: myapp-argo-project
- Sync Policy: manual
- Source:
- Repository Url: https://github.com/Jaland/argo-tekton-flow.git
- Path: argo/
- Destination:
- Cluster Url: https://kubernetes.default.svc
- Namespace: developer-gitops
At this point we should see our new application inside of UI. Lets go ahead and open it up. You will notice that it shows 2 objects in the graph both of which are “applications”. These two applications are myapp-pipeline which will install our pipeline, and myapp-deployment which will be used to create and monitory our dev deployment.
Currently we are out of sync since we set our “Sync Policy” to manual, lets go ahead and hit the sync button at the top.

When we go back on our home page we should not see our two new Argo Applications inside of our Argo Ui. Feel free to click around each of the new applications and see what resources they created. You will notice here that applications should already have synced all their resources, this is because they are set to “Automatic Sync”. Auto Sync means whenever argo detects changes it will also make changes to the application.
Note If you are using different a different namespace or demo application you may need to make some adjustments to the Argo App files inside of the
argo/pipeline
Putting it all together
Now lets see how all the work we just did actually ties together.
Running our pipeline
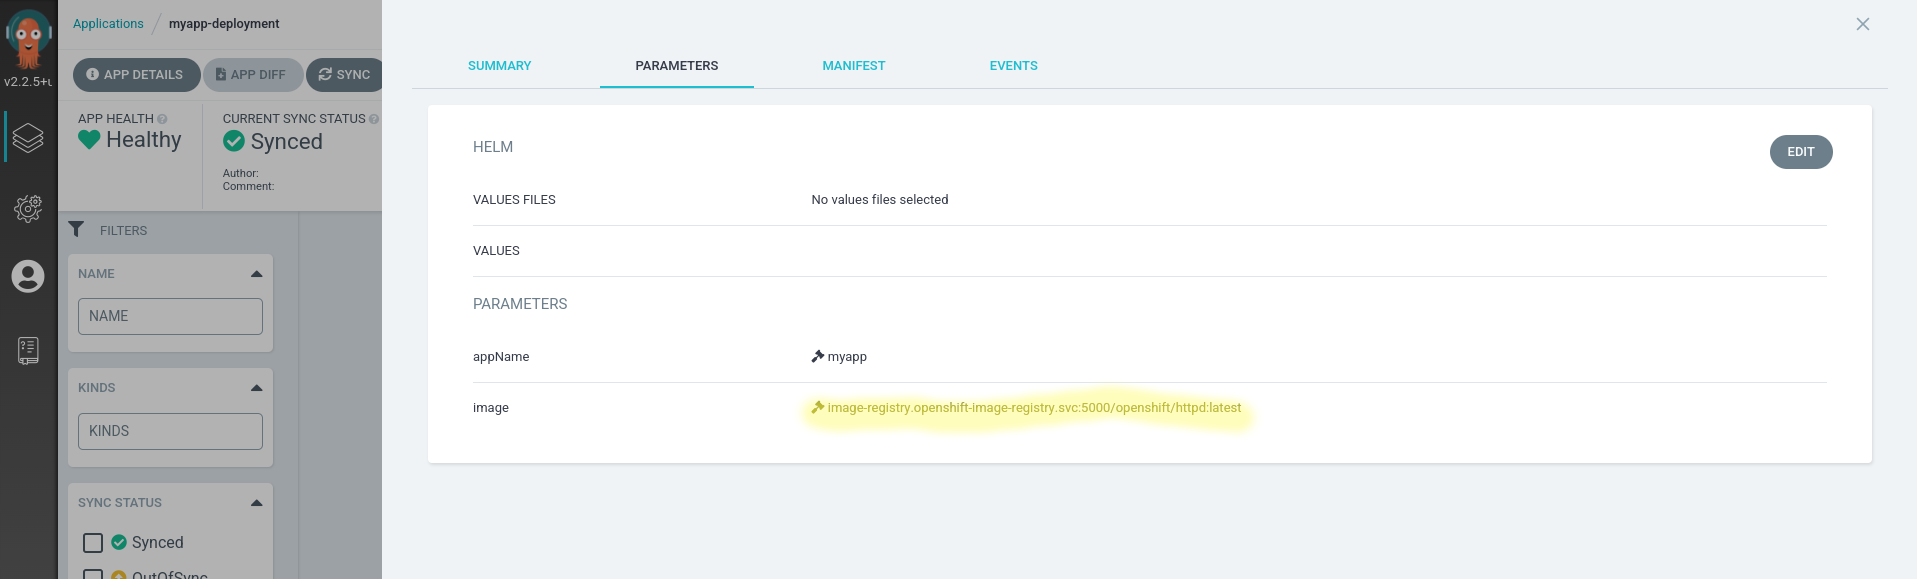
Since the end result of our pipeline is going to be modifying the image on our myapp-deployment application lets first take a look at the current value.
- Navigate to
myapp-deploymenton the Argo UI - Click
App Details - Open the
Parameterstab - Take note of the image, it should be
image-registry.openshift-image-registry.svc:5000/openshift/httpd:latest - If you check the
Deploymentinside of themyapp-devnamespace it should have the image
Now lets actually run our pipeline:
- Navigate to
myapp-devnamespace Admin ViewPipelines -> Pipeline- Click the
myapppipeline Actionsdropdown top right- Start
- Use all the defaults, except
Workspacewhich should be set toVolumeClaimTemplate- You may need to create a PVC and use that depending on your version of pipelines

Now lets way for our pipeline to complete
Validating our flow
Once our pipeline is complete lets navigate back to the Parameters tab of our myapp-deployment, and now you should notice the image value has changed.

Wrap Up
In this demo we have shown how to use ArgoCD and Tekton to deploy and monitor both your Application and the infrastructure pieces related to it. Hopefully this was a useful start in creating your new GitOps flow using these tools